API利用マニュアル
SKELETON CARTのAPIについて
version 2.1.4以降では、APIを利用して在庫数を含む商品データや、カートに入っている商品数を表示することができます。
本マニュアルでは以下の点についてご案内します。
APIで表示できるデータ
APIを利用して以下のデータを商品ページなどに表示することができます。
- 商品ID
- 商品名
- 価格
- グループID
- 在庫数
- 重量
- カートに入っている商品数
APIの利用方法
SKELETON CARTのダウンロードファイルに同梱されているsample_item.htmlと同じように、APIとモーダルウィンドウを利用するには、以下の必要なJavaScriptを読み込んでください。
<!-- SKELETON CARTの動作に必要なJavaScript -->
<script src="https://code.jquery.com/jquery-3.2.1.min.js" integrity="sha256-hwg4gsxgFZhOsEEamdOYGBf13FyQuiTwlAQgxVSNgt4=" crossorigin="anonymous"></script>
<script src="https://cdnjs.cloudflare.com/ajax/libs/popper.js/1.11.0/umd/popper.min.js" integrity="sha384-b/U6ypiBEHpOf/4+1nzFpr53nxSS+GLCkfwBdFNTxtclqqenISfwAzpKaMNFNmj4" crossorigin="anonymous"></script>
<script src="https://maxcdn.bootstrapcdn.com/bootstrap/4.0.0-beta/js/bootstrap.min.js" integrity="sha384-h0AbiXch4ZDo7tp9hKZ4TsHbi047NrKGLO3SEJAg45jXxnGIfYzk4Si90RDIqNm1" crossorigin="anonymous"></script>

<!-- APIの動作に必要なJavaScript -->
<script>
SkeletonCartSettings = {
    // カートをルートパス以外に設置する場合は、以下にパスを指定する
    // 例)/shop に設置する場合は、/shopを指定する
    // 例)別サーバ(https://cart.example.com)に設置する場合は、https://cart.example.com を指定する
    app_base: '/',
};
</script>
<script src="common/js/api.js"></script>
<script src="common/js/sc.js"></script>
なお、jQuery/Bootstrapのライブラリファイルは最新版のご利用をお勧めいたします。
カートに入っている商品数を表示
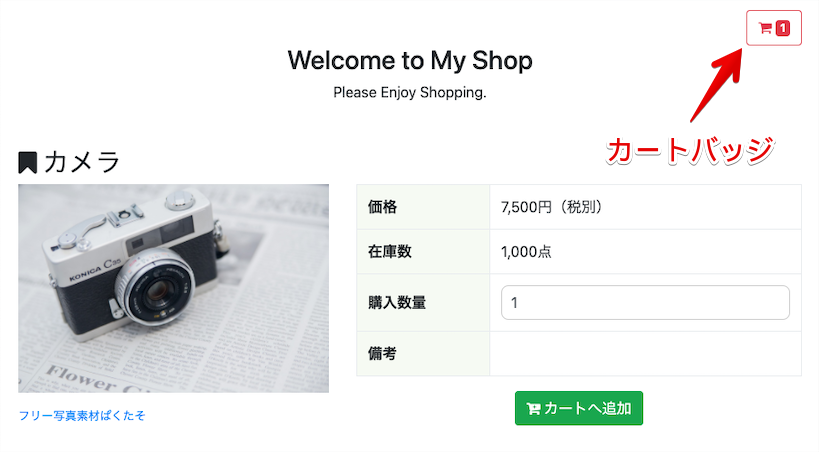
sample_item.htmlの右上にあるカートバッジ(カート内にある商品数を表示している部分)のように、カートに入っている商品数を表示するには、以下の部分をご利用ください。
<span id="item_count"></span>モーダルウィンドウの設置
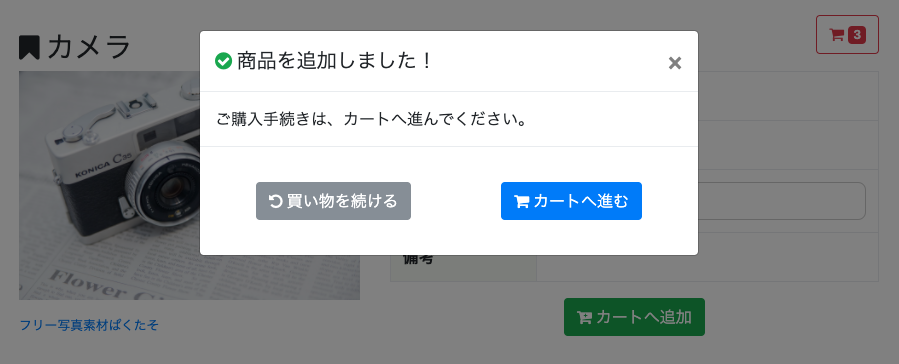
sample_item.htmlと同じように、「カートへ追加」ボタンをクリックした際にモーダルウィンドウを表示するには、以下のようにHTMLを記載してください。
formパーツの修正
以下のformパーツにclass="item"とdata-toggle="modal"data-target="#myModal"を追加してください。
formタグ部分
<form method="post" name="newdat" enctype="multipart/form-data" action="cart/add" class="item">
ボタン部分
<input type="submit" value="カートへ追加" class="btn btn-success" data-toggle="modal" data-target="#myModal">モーダルウィンドウ部分のHTMLを追加
表示されるモーダルウィンドウは、sample_item.htmlの以下を参考にHTML内に追加してください。
<!-- Modal -->
<div class="modal" id="myModal" tabindex="-1" role="dialog" aria-labelledby="myModalLabel" aria-hidden="true">
<!-- 商品を追加した際のモーダルウィンドウ -->
<div class="modal-dialog" role="document" id="modal-success">
<div class="modal-content">
<div class="modal-header">
<h5 class="modal-title" id="myModalLabel"><i class="fa fa-check-circle" aria-hidden="true"></i> 商品を追加しました!</h5>
<button type="button" class="close" data-dismiss="modal" aria-label="Close">
<span aria-hidden="true">×</span>
</button>
</div>
<div class="modal-body">
ご購入手続きは、カートへ進んでください。
</div>
<div class="modal-footer">
<button type="button" class="btn btn-secondary modal-close" data-dismiss="modal"><i class="fa fa-undo" aria-hidden="true"></i> 買い物を続ける</button>
<form>
<input type="button" value=" カートへ進む" onClick="location.href='cart/show'" class="btn btn-primary">
</form>
</div>
</div>
</div>
<!-- 商品を追加できなかった場合のモーダルウィンドウ -->
<div class="modal-dialog" role="document" id="modal-error">
<div class="modal-content">
<div class="modal-header">
<h5 class="modal-title" id="myModalLabel"><i class="fa fa-exclamation-circle" aria-hidden="true"></i> 商品を追加できませんでした。</h5>
<button type="button" class="close" data-dismiss="modal" aria-label="Close">
<span aria-hidden="true">×</span>
</button>
</div>
<div class="modal-body">
<p class="error-message"></p>
</div>
<div class="modal-footer">
<button type="button" class="btn btn-secondary modal-close" data-dismiss="modal"><i class="fa fa-undo" aria-hidden="true"></i> 買い物を続ける</button>
<form>
<input type="button" value=" カートへ進む" onClick="location.href='cart/show'" class="btn btn-primary">
</form>
</div>
</div>
</div>
</div>商品ページにAPIから得た商品データを表示する
商品ページに以下のHTMLを記載することで、商品データの中身を表示することができます。
| 商品ID | <span class="item-id"></span> |
|---|---|
| 商品名 | <span class="item-name"></span> |
| 価格 | <span class="item-price"></span> |
| 商品グループID | <span class="item-groupid"></span> |
| 在庫数 | <span class="item-stock"></span> |
| 重量 | <span class="item-weight"></span> |
また、上記のHTML部分や、データ取得後の処理はapi.jsのonLoadItem: function(data)部分で変更可能です。
例. 商品名を表示する部分を <span class="product-name"></span> に変更する
変更前(api.js 56行目)
var $name = $('span.item-name', this);
変更後
var $name = $('span.product-name', this);上記のほか、onLoadItem: function(data)内を参考に処理を追加していただけます。
なお、APIでは以下のように商品データを得ることができますので、api.jsの内容とあわせてご確認ください。
{
    "success": true,
    "error": null,
    "result": {
        "id": "1",
        "name": "くまのぬいぐるみ",
        "price": 1500,
        "groupId": "1",
        "stock": "100000",
        "weight": "500"
    }
}
異なるドメインのHTMLで商品データを表示する
商品ページ(HTML)を設置するドメインと、SKELETON CARTを設置するドメインが異なる場合、以下のとおり設定することでAPIを利用できます。
init.phpの設定
初期設定ファイル init.php で以下の部分に「APIの利用を許可するドメイン」を記載してください。
// APIアクセスを許可するサイト
'allowed_origin' => 'https://www.example.com',
商品ページ(HTML)のSkeletonCartSettingsとJavaScriptのパス修正
SkeletonCartSettingsに「SKELETON CARTを設置したURL」を追加し、api.jsとsc.jsの読み込みパスも変更してください。
なお、SKELETON CARTをルート以外(例. https://www.example.com/shop/ )に設置する場合、ディレクトリ名も含めるようご注意ください。
<script>
SkeletonCartSettings = {
    // カートをルートパス以外に設置する場合は、以下にパスを指定する
    // 例)/shop に設置する場合は、/shopを指定する
    // 例)別サーバ(https://cart.example.com)に設置する場合は、https://cart.example.com を指定する
    app_base: 'https://www.example.com',
};
</script>
<script src="https://example.com/cart/common/js/api.js"></script>
<script src="https://example.com/cart/common/js/sc.js"></script>
APIのご利用方法は以上となります。
sample_item.html, api.jsを参考にぜひご利用ください。